Wednesday, February 26, 2014

rainy day cookies


I love rainy days, what a wonderful time to bake and make comfort foods! Today I thought of making my 'no bake' drop cookies would be fun. Today I had my four year old grandson Finley over, he was my little helper.  I explained to him that I made these cookies when I was young and his reply was me too!
 No Bake Drop Cookies
  •   1/2 cups cocoa    
  •  2 cups sugar
  • 1/2 cup milk ( I use evaporated milk )
  • 1/2 cup butter
  • dash of salt
       Mix above ingredients thoroughly and bring to boil; add
       1 teaspoon of vanilla.
        remove from heat; add
  • 3 cups quick cooking oatmeal
  • 1 cup chopped nuts ( I use pecans )
       Mix thoroughly, Drop cookies by teaspoon on parchment or wax paper and let cool and smile. :)
                                                                                   

Sunday, February 23, 2014

Life is always evolving

Our garden is dormant now but this is the time to think of Spring. It's time to start looking at seed catalogs (I love the organic ones) and the spectacular heirlooms that are out there. My garden brings forth all kinds of wonderful gifts such as sitting and enjoying Gods beauty or the delectable bounty it brings forth. We have to start somewhere so lets start at the foundation, composting.
The kitchen is a good start for composting! I use an old red bucket with a lid for all of my food scraps. You can fill your bucket with left over tea and coffee grounds, egg shells, and raw remains of chopped veggies.( No meat or bone product.)My compost bucket gets emptied every four or five days in to the out side wood bin.


Michael, my husband, made me this custom compost crate. We alternate vegetable scraps and leaves to create a beautiful organic matter.
This is our compost leaf pile that we stir with a pitch fork every two weeks. The importance of stirring the pile is because the leaves break down faster and the underneath you will find the pure organic matter (this is what is  going to make a fabulous garden).Of course Tula our Australia cattle dog and (baby) Ferguson Dash Bigglesworth our corgi are always making sure things are done properly.

Here we are mixing compost and organic leaf matter into the soil to create a rich soil base that will ready the soil for a beautiful spring planting.
Baby, my corgi, is overseeing the construction to make sure everything is done properly.
This is the finished product that allows us to be ready to plant our spring crop.This is the foundation and on my upcoming blog you will see this garden transformed in to what is the unexpected.
"Of all the wonderful things in the wonderful universe of God, nothing seems to me more surprising than the planting of a seed in the blank earth and the result thereof" - Celia Thaxter


Wednesday, February 19, 2014

Mirrors of Gold and Old Shipwood

As you enter my front door this is the room that greets you. Welcome! Please come in....
 I would like to begin with my focal point, every room needs one!
 In this case, the focal point is the couch which is painted and highlighted in gold. It was purchased from an old antique barn and looked more like it had seen better days. The wood was dark and almost black from the old varnish and the fabric was tattered and torn. I had to strip the wood first then came the gold that I layered on. Working with a neutral covering worked well so I could use pillows to bring in and balance my color.
 
 The triple pleated curtains I made in the back ground helps to set the room off. The soft teal is the color I picked out to start this project. Large rods are very expensive so I went to my local lumber yard and purchased the large dowels and just sprayed them gold along with the bamboo rings. The beautiful pained window is another lovely gift from my husband that he made for me from one of his window finds. The coffee table is another one of my favorites, it is made from an old ship hatch with the rusty medal still attached. I feel like this piece gives the room a nice rugged quality. My husband just added legs that he made from an old piece of wood. Yes, I even get beautiful pieces of old wood out of the trash. The cute little writing table was on the side of the road and had to be completely glued back together but I'm glad I took the time, its perfect for this room. The teal sideboard is from Habitat it needed a little pizazz so in came the brighter teal. (thank you cousin Harriet for showing me Habitat! Harriet is also a very beautiful decorator and has given me wonderful ideas.) Complimenting the sideboard is my wonderful shell lady that was a gift from my cousin Jennifer. ( Jennifer's decorating decor in her house is one of my most admired.) The large plain door was removed and the small french doors were added to give the room an opened look. Thanks to my sister Joy I got the idea. The doors had to be teal to compliment the curtains and sideboard.
This beautiful book case was handmade with no nails and was  antique painted by my husbands mother Lorain years ago. Red is always a beautiful color to compliment the teal and blue in my house.


This mirror sideboard is really a beautiful oak piece under the white paint. Yes I painted it and I can always strip it back to the original if I need to use it in a darker setting. Never be scared to change something you can always strip color or add. The hanging christening gown is my daughter Amanda's and it makes a statement in a white room.Sometimes using what we have makes a big impact when decorating.
Thank you for stopping in, please come again!


Sunday, February 16, 2014

Candlesticks and Bobeches

 Candles create a certain ambience in the home and so I like to put at least .. well a lot in every room! I even have a few drawers hidden away with a stash of candles.
 
My cousin Jennifer gave me some of these brass candlesticks and from there my collection started to grow. (Thanks cousin! I love you dearly!) I feel like this gives the room a big statement when they are all lit. I wanted different heights to create a mismatched look that comes together.
 
These candlesticks came from an old bed frame that I found in the garbage. I had my husband cut them down for me and I painted them.
 
 
These two candlesticks I featured in my bedroom post but here is a closer look at them. They are from an old stairway that my husband cut down for me. I let the candle wax run down them to give it an antique look.
 
 These are all different sizes of crystal candleholders. I used bobeches to make them stand out. Bobeches are the little dishes that slip under the candle that catches the wax when it melts. They are placed on an antique frame that I found at a flea market. I just ordered mirrored glass to fit into it. Most glass stores will cut the mirror for you and install it if you bring them the frame. I will be using these candles in an upcoming blog for a bridal brunch I am hosting with my daughters. Check it out in the spring!
 I purchased these at a discount home décor store and felt like they worked well with the ginger jar. This spot in the house works well because of the mirror and the reflection it gives. 
 
I also like to display my candles in unconventional ways. Sometimes things break and it seems that in my household its teacups so instead of getting rid of the saucers I use them for either hanging on the wall or collecting jewelry or in this case candles.  My daughter Amanda found the beautiful rainbow dripping candles for me. It gives you a great excuse to open up a bottle of chianti!  Amanda you are one of the treasures of the world and God blessed me with you.
As I leave you let me remind you to save all or your broken and leftover candlesticks to use for fire starters! Future blog in the fall!  

Friday, February 14, 2014

Wednesday, February 12, 2014

Gooey Pecan Bourbon Blondie Brownies

BOURBON PECAN BLONDIE BROWNIES!

First off I have to give a big thank you to Jocelyn for your wonderful jar of pecan bourbon recipe! She is not only beautiful but a very talented young lady!
To make Jocelyn's jar of pecan bourbon:


soak 1 cup of pecans in water for 20 minutes to release the tannins. Then, toast on a pan in an oven checking frequently for about 8 to 10 minutes to bring out the flavor. Break up the pecans and put them in a 1 pint mason jar and fill with the bourbon of your choice. Keep the container in a dark cool area and shake every day for 2 weeks. This makes a lovely give all by itself!
 
OOEY GOOEY PECAN BOURBON BLONDIE BROWNIES
 
  • 1 cup of light brown sugar
  • 1/4 cup of melted butter
  • 1 egg
  • 1 cup of flour
  • 1 teaspoon of baking powder
  • 1/8 teaspoon of salt
  • 1/2 teaspoon of vanilla
  • 1 1/2 teaspoons of just the Jocelyn's bourbon pecan liquid
  • 1 1/2 teaspoons of the ground bourbon pecans from Jocelyn's bourbon pecan
Preheat your oven to 350. Cream together brown sugar, butter, and egg. In a separate bowl sift together the flour, baking powder, and salt. Add it to creamed mixture. Add vanilla, bourbon liquid, and ground bourbon nuts. Put it in a greased brownie pan and bake in preheated oven 350 for 20 to 25 minutes. Cool 5 minutes and add powdered sugar to top. Brownies will appear to be really gooey but will firm up as they cool.
 
P.S. Does the cowboy hand towel look familiar!?!?!? Great for entertaining! 

Sunday, February 9, 2014

DIY: How To Give Handtowels Pizzazz!

In my last blog I mentioned my hand towels and how I would bring them up again. The hand towels featured in my bathroom were store-bought but a lot of times if I can't find the style I'm looking for I just make my own or I will add a little flair to a store-bought piece.
 I found this small piece of blue fabric at the flea market which already had the blue ribbon attached. I just added the elaborate trim! To keep embellished towels in shape hand wash and lay flat to dry.


The cowboy hand towel would be perfect for a child's bathroom but I plan on using mine for a picnic in the summer. I'm using the leftover cowboy fabric that I made the hand towel to redecorate my grandson Fin's room (upcoming blog!) .

The hydrangea towel started with a plain piece of white cotton material. I than cut out the hydrangea and sewed it on using the zigzag stitch. To give it an old look, I added a crocheted border along with the old French knot. 

Step-by-step instructions on how-to!

I've taken a simple monogrammed towel from the store that I prewashed beforehand (you can also use a plain one too).

My towel measures 16' across so when you make your strips you want them to be 1 1/2 inches longer for the seam. (The strips measure 17 1/2'x5' and 17 1/2'x 2 1/2') Make sure that you wash fabric before cutting incase it shrinks.
I than folded my strips and ironed them down placing the smaller strip on the larger and sew them on the raw edge.


Take your sewn strip and flip the small strip so that the seam does not show (iron it down) than take your sides and fold to make a hem.

 Now it's time to sew it on! Just place it on the towel and sew straight across (pin in place if needed).

This is my huge helper. Literally. Look at him work!


Wednesday, February 5, 2014

Salle De Bain

You all know I love the french...they make everything sound good. This post I am inviting you into my bathroom.


Another example of the masculine meets feminine. I had to have the antlers and the androgenous wall color. I think grey brings out an elegance that compliments both styles.
 

The rod iron bench, I found...In the garbage. I recovered it in the butterfly fabric.

I have been collecting miniature perfume bottles for 34 years. I started collecting when I was in cosmetics and they were so beautiful. I've now passed many of them to my grandaughter Reidi so that she can use them in her bedroom decor.   


This stained glass window was made for me by my husband. Love it! You may not notice the significance of the silver tree. This tree was made by grapevines that grew in my father's garden. I formed them into the tree and it is now silver although it has been many colors over the years.


The St. Bernard was given to me by my daugher Cassie. I framed it in a flea market find frame.  I collect soaps, I have them displayed in the apothecary jar. The thing I am most proud of are my knobs. These knobs were painted for me by my grandson, Tyler when he was 4 years old. I love them. ( Notice the candelabra and hand towels I will have a an upcoming post on them.) 

I think the thing I take away from a lot of my rooms are the things most personal to me. Everything else is just fluff.
 

Sunday, February 2, 2014

Snowpacalypse

Here is just a quick peak at what the winter storm brought to Charleston other than snarreled traffic and closed bridges...


Hats, Ties, Belts and Brooches

You've got to be wondering what I mean by the title, right? OK. Well, this is how I made my bedroom work and make my husband happy as well.
 
If you've ever tried to make a room both feminine and comfortable yet masculine you might know what I struggled with. My husband, a lifetime rugby player (you're quintessential tough guy), has always been a great supporter of my creativity. I've tried to keep his sentiments in mind while I put our room together (he is a great help with the painting of course). I use accessories like his ties, belts and my hats and baskets to decorate. When you decorate a room, you want it to make you smile! So I'll start with our closet. Where else?!
 
 
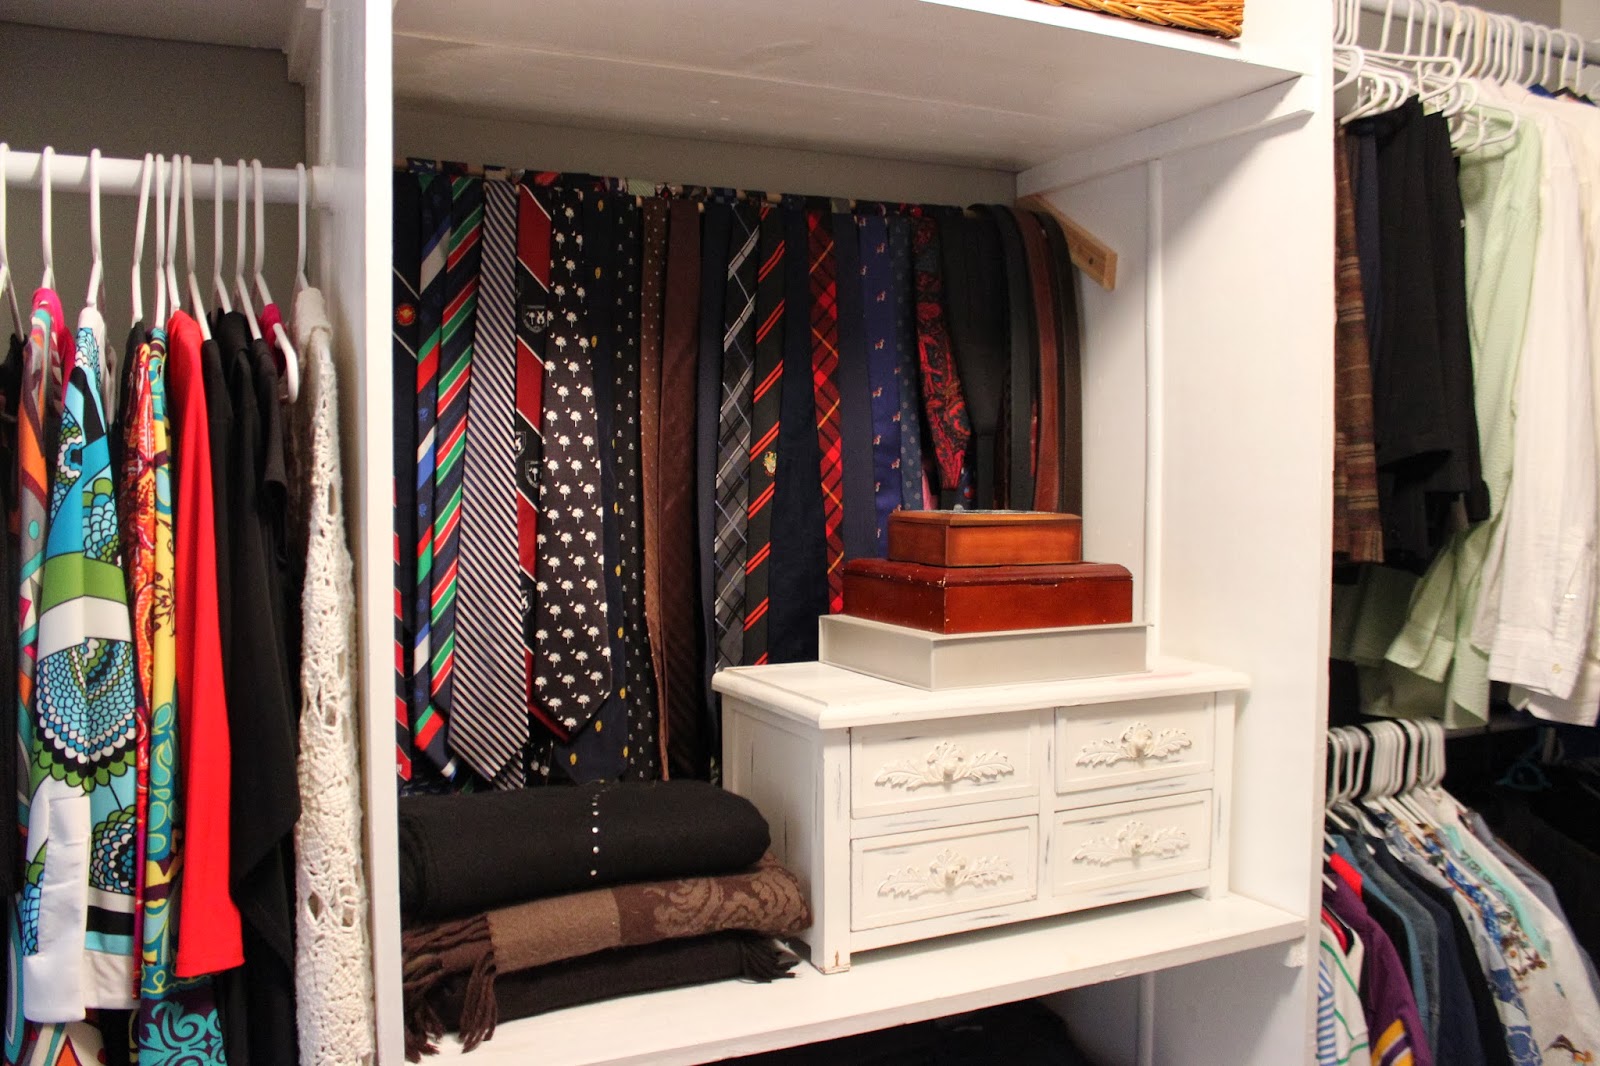
This is a glimpse into the closet my wonderful husband built for me. He made it possible for me to bring our two styles together. Take a look below and see the way we have made it flow...

 
First we have our belts and his ties with one of my jewelry boxes and my scarves.

 
In this view you can see some of my hats and a neat way to display your everyday clothes. Even if you do not have walk-in...you can make this design a part of your closet and home organization as well. Like I said, my husband and I made this closet ourselves, you can do this too!
 
 
OK! Now close that door. We are now to our sitting area...have a seat for tea!

We vacationed in Europe last year...It was the best trip I've ever experienced. While there, I fell in love with having tea. I've always loved tea but the whole production of it...I had no idea. When I went to Scotland they had tea and scones with clotted cream and jam. It was one of the most delectable afternoon treats.
 

 Please notice the deer antlers...this is one area in which I have brought in some masculinity. Form meets function with this piece in that you can't get more manly than the antlers and it serves as a great place to hang a work out bag.
 
Next is where I bring in my children, my girls. They are my husband's and my life, if anything...they are the one thing we agree on ;) . Here is where I remember them as babies...
 
I matted and framed the gowns in which I brought them home from the hospital. I believe that nothing should be stored away if you love it, especially in decorating. The candle stick holders, my husband made from an old spindle turned staircase.   
 
 
My vintage purses have some antique brooches that I love pinned to them. They were in the last post as well but it's one more element where you can incorporate something you love without storing it away.  
 
Here is where I break the rules...yes, I am a little bit of a rebel. One rule of decorating is to not necessarily bring in personal details. I would like to show you how I did it!


I wanted a collage of my family. As my family grew, so did my collage. When I began, I started in the middle.. as you add to the top, you must be proportionate to the bottom. No other rule than that.
 
 
Where I relax...


This chair...has been recovered like 13 times. It has been a timeless piece within my home and has transformed countless times. This gingham style has become my favorite. Nicole...you may not be reading...but thank you for the lamp, all that I changed was the shade. PS...love you, you're beautiful!
 
My husband and my daughters.. I've always wanted to know what they thought. When I've tried something I always have said.. "I love it!!....You love it??!"